
Java Script(8)-비동기, promise, async, jason

*이 글을 읽기전에 작성자 개인의견이 있으니, 다른 블로그와 교차로 읽는것을 권장합니다.*
1. 동기식과 비동기식
동기식과 비동기식 작업은 프로그래밍에서 작업의 실행과 관련된 방식을 나타냅니다. 장단점에 따라 사용도가 다릅니다.
1-1. 동기식(Synchronous)
순차적으로 진행되며, 한 작업이 완료되기를 기다렸다 다음 작업을 실행합니다. 작업은 실행 순서대로 진행되므로, 한 작업이 완료되기까지 다음 자업은 대기상태입니다. 대표적인 예시로 함수 호출과 루프에서 순차작업이 있습니다.
- 장점: 코드가 직관적이기에 디버깅과 이해하기 쉽습니다.
- 단점: 하나의 작업이 끝날때까지 다음 작업이 실행되지 않기에 전체적인 처리(Process_효율성이 느려질 수 있습니다. 이에 따라 대기 시간이 발생하면 블로킹되는 현상 또한 발생합니다.
function func1(){
    for(let i=0; i<1000000000; i++);
    return 10;
}

function func2(){
    return func1() + 10;
}

function func3(){
    return func2() + 10;
}

console.log('프로그램이 시작됩니다');
const result = func3();
console.log(result);
1-2. 비동기식(Asynchronous)
순차적으로 진행되지 않고, 한 작업이 완료되기를 기다리지 않고 다음 작업을 실행합니다. 작업이 백그라운드에서 병렬로 실행되며, 작업이 완료되면 콜백 함수나 프로미스를 통해 결과를 처리합니다. 대표적인 예시로 AJAX요청, 파일 읽기 등이 있습니다.
- 장점: 여러 작업을 동시에 실행하여 성능을 향상시킬 수 있습니다. 대기 시간이 없거나 최소화되어 처리효율성(Process)이 높아집니다.
- 단점: 코드가 복잡해지고 이해하기 어려울 수 있습니다. 예외 처리와 오류 관리가 복잡할 수 있습니다.
function timeout(){
    console.log('1번문장 실행!');
    setTimeout(() => {
        console.log('2번문장 실행!');
    }, 3000);
    console.log('3번문장 실행!');
}

timeout();
비동기식 예제
주어진 초가 지나면 callback 함수를 호출하는 함수를 작성해보자.
(단, 주어진 초가 0보다 작으면 에러를 발생! callback 함수가 없으면 에러를 발생함);
* 작성할 함수
function run(callback, seconds){ }
에러를 발생하는 문장
throw new Error(메시지);
function run(callback, seconds){
    if(!callback){
        throw new Error('callback 함수가 없습니다!');
    }
    if(!seconds || seconds < 0){
        throw new Error('초는 항상 0보다 커야합니다!');
    }
    setTimeout(callback, seconds);
}

/*호출하기 */
// run(()=>{
//     console.log('타이머 완료');
// }, 3000);

run(()=>{
    console.log('타이머 완료');
}, -3000);try-catch문: node.js에서 파이썬의 try-except와 비슷한 기능으로 예외처리를 할 수 있습니다.
try{
    run(()=>{
        console.log('타이머 완료');
    }, -3000);
}catch(error){
    console.log('에러발생 후 정상적인 종료!');
}
2. 프로미스(Promise)
JS 비동기 작업(특정작업이 완료될 때까지 기다리지 않고 다른 작업을 수행할 수 있음)을 다루는 객체입니다. 비동기 작업이 완료시 성공(resolve) 또는 실패(reject)같은 결과를 처리하기 위해 사용됩니다. 주로 콜백지옥(callback hell)을 피하고 비동기 작업 코드를 간결하고 유지보수하기 쉽게 만들어줍니다.
프로미스를 생성할 때 'new Promise()'를 사용하며, 생성자 함수의 인자로는 실행할 비동기 작업을 포함한 함수가 전달됩니다. 이 함수는 resolve와 reject라는 두 개의 콜백 함수를 인자로 받습니다.
2-1. 프로미스의 상태
- 대기: 비동기 작업이 아직 수행되지 않은 상태
- 이행: 비동기 작업이 성공적으로 완료된 상태. resolve() 호출
- 거부: 비동기 작업이 실패한 상태. reject() 호출
2-2. 프로미스 주요 메서드
- .then(): 프로미스가 이행됐을 때 호출되는 콜백을 등록합니다.
- .catch(): 프로미스가 거부됐을 때 호출되는 콜백을 등록합니다.
- .finally(): 프로미스의 상태와 상관없이 항상 호출되는 콜백을 등록합니다.
function run(seconds){
    return new Promise((resolve, reject) => {
        if(!seconds || seconds < 0){
            reject(new Error('초는 항상 0보다 커야함!'));
        }
        setTimeout(resolve, seconds);
    })
}

run(3000)
    .then(() => console.log('타이머 완료!'))
    .catch(console.error)
    .finally(() => console.log('프로그램 종료!'));
const myPromise = new Promise((`esolve, reject) => {
// 비동기 작업 수행
// 작업이 성공하면 resolve() 호출
// 작업이 실패하면 reject() 호출
});
myPromise
.then((result) => {
// 성공했을 때의 처리
})
.catch((error) => {
// 실패했을 때의 처리
});
function fetchEgg(chicken){
    return Promise.resolve(`${chicken} => 🥚`);
}

function fryEgg(egg){
    return Promise.resolve(`${egg}=>🍳`);
}

/*new Error자체가 이미 error처리가 되어있음 */
function getChicken(){
    // return Promise.resolve(`🐓=>🍗`);
    return Promise.reject(new Error('치킨을 만들 수 없음'));
}

getChicken()
    .then(fetchEgg)
    .then(fryEgg)
    .catch(() =>'🐔')
    .then(console.log);
동기/비동기로 처리할때 코드식 비교-
동기식으로 처리할때:
getUserInfo(userId, (user) => {
    getPosts(user.id, (posts) => {
        displayPosts(posts);
    }, (error) => {
        handleError(error);
    });
}, (error) => {
    handleError(error);
});
비동기식으로 처리할때:
getUserInfo(userId)
    .then((user) => {
        return getPosts(user.id);
    })
    .then((posts) => {
        displayPosts(posts);
    });
    .then((error) => {
        handleError(error);
    });
위 두식을 비교하면 비동기로 처리할때, .then()으로 처리했기 때문에 코드가 보기 편합니다.
2-3. Promise 메서드
Promise를 사용할때 Promise뒤에 메서드를 붙여 여러 버전으로 실행가능합니다.
- Promise.all(): 병렬로 한번에 Promise실행
- Promise.race(): 주어진 Promise중에 제일 빨리 수행된 것이 실행
- Promise.all(): 하나의 프로미스라도 실패하면 전체를 에러로 처리
- Promise.allSettled(): 여러 프로미스를 병렬적으로 처리하되, 하나의 프로미스가 실패해도 무조건 이행
function getBanana(){
    return new Promise((resolve)=>{
        setTimeout(()=>{
            resolve('🍌');
        }, 1000);
    });
}

function getApple(){
    return new Promise((resolve)=>{
        setTimeout(()=>{
            resolve('🍎');
        }, 3000);
    });
}

function getOrange(){
    return Promise.reject(new Error('오렌지 없음!'));
}

/*1초+3초 */
getBanana()
    .then((banana) => getApple().then((apple) => [banana, apple]))
    .then(console.log);
Promise.all([getBanana(), getApple()])
    .then((fruits)=>console.log('all', fruits));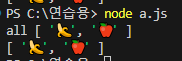
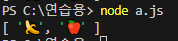
Promise.race([getBanana(), getApple()])
    .then((fruit) => console.log('race',fruit));
Promise.all([getBanana(), getApple(), getOrange()])
    .then((fruits) => console.log('all',fruits))
    .catch(console.log);
Promise.allSettled([getBanana(), getApple(), getOrange()])
    .then((fruits) => console.log('all',fruits));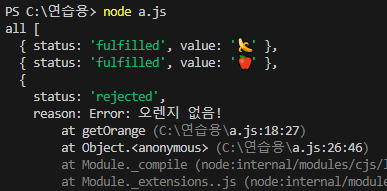
3. async / await
자바스크립트에서 비동기 코드를 더 쉽게 작성하고 관리할 수 있는 기능입니다. 비동기 작업을 동기적인 코드처럼 작성하도록 도와줍니다.
3-1. async 함수
- async 키워드를 함수 앞에 붙여서 선언된 함수를 async 함수라고 합니다.
- async 함수는 내부에서 프로미스를 반환합니다.
- async 함수 내부에서 await 키워드를 사용하여 비동기 작업이 완료될 때까지 기다릴 수 있습니다
3-2. await 표현식:
- await 키워드는 async 함수 내부에서만 사용할 수 있습니다.
- await 키워드 뒤에는 프로미스가 오며, 프로미스가 완료되고 결과가 반환될 때까지, async 함수의 실행을 일시 중지합니다.
- 프로미스가 이행되면 그 결과가 반환되고, 프로미스가 거부되면 에러가 발생합니다.
예시: 아래 동기 코드식을 async/await을 사용해서 비동기 코드식으로 변환
function getBanana(){
    return new Promise((resolve)=>{
        setTimeout(()=>{
            resolve('🍌');
        }, 1000);
    });
}

function getApple(){
    return new Promise((resolve)=>{
        setTimeout(()=>{
            resolve('🍎');
        }, 3000);
    });
}

getBanana()
    .then((banana) => getApple().then((apple) => [banana, apple]))
    .then(console.log);
function getBanana(){
return new Promise((resolve)=>{
setTimeout(()=>{
resolve('🍌');
}, 1000);
});
}
function getApple(){
return new Promise((resolve)=>{
setTimeout(()=>{
resolve('🍎');
}, 3000);
});
}
async function fetchFruits() {
const banana = await getBanana();
const apple = await getApple();
return [banana, apple];
}
fetchFruits().then((fruits) => console.log(fruits));
async 예제
위의 3_promise-egg.js와 결과가 동일하도록, async함수를 사용하여 비동기식으로 처리해보자.
function fetchEgg(chicken){
    return Promise.resolve(`${chicken} => :달걀:`);
}
function fryEgg(egg){
    return Promise.resolve(`${egg} => :계란_프라이:`);
}
function getChicken(){
    // return Promise.resolve(`:수탉: => :닭다리:`);
    return Promise.reject(new Error('치킨을 만들 수 없음'));
}
async function makeFiredEgg(){
    try{
        chicken = await getChicken();
    }catch{
        chicken = ':닭:';
    }
    const egg = await fetchEgg(chicken);
    return fryEgg(egg);
}
makeFiredEgg().then(console.log);
4. Console
4-1.console.clear():
console의 내용을 모두 지웁니다.
console.log('로딩중 ...');
console.clear();
개발시 콘솔 사용법에 있어서 일반적으로 사용됩니다.
- log: 개발
- info: 정보
- warn: 경고
- error: 에러
console.log('log'); // 개발
console.log('info'); //정보
console.warn('warn') // 경고
console.error('error') //에러
4-2. assert():
console.assert()에서 ()안의 조건을 만족하지 않는다면 에러 메시지를 출력합니다.
console.assert(2 === 2, '두 값이 달라요!');
console.assert(2 === 3, '두 값이 달라요!');
4-3. 객체 출력
console.table()은 talbe로 출력, console.dir()은 객체를 콘솔에 출력하는데, 객체의 속성들을 펼쳐서 보여줍니다. 구조적이고 자세한 정보를 제공합니다.
- showHidden: true: 객체의 숨겨진 속성(hidden properties)을 출력합니다.
- depth: 0: 출력할 객체의 깊이(depth)를 설정합니다. 0으로 설정되어 있으므로 객체의 속성만 출력하고, 중첩된 객체의 내용은 출력하지 않습니다.
const user = {userid:'apple', name:'김사과', age:20, company:{name:'sk', addr:'서울중구'}}
console.log(user);
console.table(user);
console.dir(user, {showHidden:true, depth:0});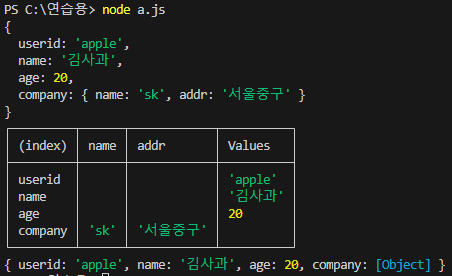
4-4. trace():
현재 실행 중인 코드의 호출 스택 정보를 출력하는 메서드입니다. 어떤 함수에 의해 호출되었는지 정보를 제공합니다. 주로 코드의 실행 흐름 추적할 때 사용합니다.
function func1(){
    func2();
}
function func2(){
    func3();
}

function func3(){
    console.log('func3() 실행!');
    console.trace();
}

func1();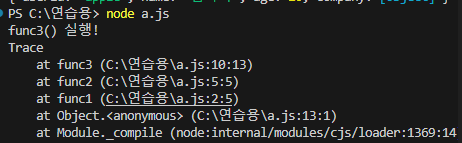
5. JSON(JavaScript Object Notation)
서버와 클라이언트 간의 HTTP 통신을 위한 경량의 데이터 형식, 포멧입니다. JSON은 키-값 쌍의 집합으로 이루어져 있습니다. 각 키는 문자열이며, 값은 문자열, 숫자, 배열, 객체, boolean, null 등의 데이터 형식일 수 있습니다.
5-1. JSON메서드
- JSON.stringify(): 자바스크립트의 객체를 JSON형식의 문자열로 직렬화하여 변환합니다.
- JSON.parse(): JSON형식의 문자열을 자바스크립트 객체로 parsing하여 변환합니다.
const Rucy = {
    name: '루시',
    age: 14,
    eat: () => {
        console.log('먹습니다!');
    }
}

console.log(Rucy);
const json = JSON.stringify(Rucy);
console.log(json);

const obj = JSON.parse(json);
console.log(obj);
5-2. fetch()
fetch()함수는 네트워크 요청을 보내고 응답 받는데 사용되는 API입니다. 주로 웹 어플리케이션에서 서버와 데이터를 주고 받을 때 사용합니다. Promise를 반환하며, 비동기적으로 데이터를 처리합니다.
/* 사용예시 */
fetch(접속할 주소)
    .then(response => {
        응답 데이터를 처리
        return response.json(); // json 형식의 데이터를 반환
    })
    .then(data => {
        // 처리된 데이터를 사용
    })
    .catch(error => {
        // 에러 처리
    });
html화면을 JSON 데이터 형식으로 포맷하기
<!DOCTYPE html>
<html lang="en">
<head>
<meta charset="UTF-8">
<meta name="viewport" content="width=device-width, initial-scale=1.0">
<title>fetch 테스트</title>
</head>
<body>
<h2>fetch 테스트</h2>
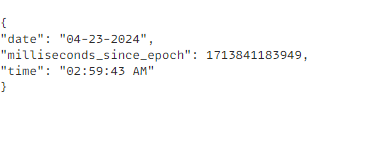
<script>
fetch('http://date.jsontest.com/')
.then((response) => {
return response.json();
})
.then ((data) => console.log(data,daate));
</script>
</body>
</html>
5-3. 클래스 사용하기
function hello(){
    console.log(this); // global객체 node.js환경은 자바환경에 따라,
    console.log(this == global);
}
hello();

// 이 js파일은 파이썬같이 모듈로써 사용할 수 있다.
class ClassA {
    constructor(num) {
        this.num = num;
    }
    classAMethod(){
        console.log('------');
        console.log(this);
        console.log('------');
    }
}

const classA = new ClassA(10);
classA.classAMethod();

console.log('------');
console.log(this);
console.log(this == module.exports);
- hello()함수: 위 코드에서 hello함수에서 argument로 this를 선언했습니다. 밑에 this == global로써, this를 전역객체로 설정했습니다. 따라서, hello함수가 호출될 때, this를 전역 객체로 가리키고, 비교결과값은 true가 출력합니다.
- ClassA(): ClassA라는 클래스를 생성합니다. 생성자로 num을 설정하였고, classAMethod 메서드에서 출력값 함수를 만들었습니다. classA클래스의 this.num의 값으로 10을 넣어, classA로 선언했고, classAMethod메서드를 호출해서, console.log('------');console.log(this);console.log('------');가 호출됩니다. 특히 console.log(this)는 classA의 this.num생성자에 10을 삽입해서 { num: 10}을 가져옵니다.
- 마지막 this == module.exports는 동일하단 뜻으로 true가 출력됩니다.
5-4. 모듈 활용하기
js에 함수를 저장하고 모듈을 설정합니다. const로 객체를 선언한뒤 모듈을 가져와 객체를 모듈처럼 사용합니다.
모듈로 사용할 js파일을 만듭니다.
/*b.js파일*/
let count = 0;
function increase(){
    count++;}
function getCount(){
    return count;}
module.exports.getCount = getCount;
module.exports.increase = increase;
/*c.js파일*/
let count=0;
export function increase(){
count++}
export function getCount(){
return count;}js파일을 가져와 객체에 모듈처럼 사용합니다.
const counter = require('./b');
counter.increase();
counter.increase();
counter.increase();
console.log(counter.getCount());
5-5. path 모듈
node.js에서 파일 경로와 관련된 작업을 수행하는데 사용되는 내장 모듈입니다.
- __dirname : 현재 디렉토리를 나타냅니다.
- __filename : 현재 파일을 나타냅니다.
- path.basename(__filename) : 파일이름만 추출합니다.
- path.basename(__filename, '.JS') : 해당 확장자이름이 들어간 파일만 제외하고 추출합니다.
- path.dirname(__filename) : 디렉토리만 추출합니다.
- path.extname(__filename) : 파일의 확장자만 추출합니다.
const path = require('path');					// 변수선언으로 모듈설치
// import * as path from path;

console.log(__dirname); //현재 디렉토리
console.log(__filename); //현재 파일

console.log(path.sep);
console.log(path.delimiter);

console.log(path.basename(__filename));         //파일 이름만 추출
console.log(path.basename(__filename, '.js'));  //확장자 제외

console.log(path.dirname(__filename));          //디렉토리만 추출

console.log(path.extname(__filename));          //파일의 확장자만 추출

const parsed = path.parse(__filename);
console.log(parsed);
console.log(parsed.dir);
console.log(parsed.base);

const str = path.format(parsed);
console.log(str);

console.log('isAbsolute: ', path.isAbsolute(__dirname));
console.log('isAbsolute: ', path.isAbsolute('../Day6'));
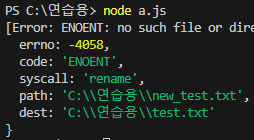
5-6. fs모듈
Filesystem의 준말로, Node.js에서 파일 시스템에 접근하고 파일을 다루는데 사용되는 내장 모듈입니다. 파일을 읽고 쓰는 작업을 수행할 수 있습니다. 동기식과 비동기식일 때 표현하는 방법이 다릅니다.
- 동기식: try-catch로 에러처릴 해야 합니다.
- 비동기식: 별도의 에러처리가 필요하지 않습니다.
const fs = require('fs'); //모듈설치
//동기식: 에러처리를 꼭 해야함!
try{
    fs.renameSync('./test.txt', './new_test.txt');
}catch(e){
    console.error(e);}
console.log('정상적인 종료!!');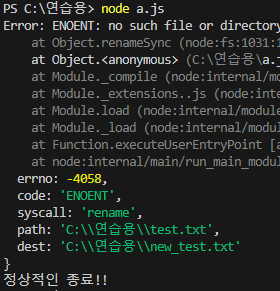
const fs = require('fs'); //모듈설치
//비동기식: 별도의 에러처리가 필요하지 않음
fs.rename('./new_test.txt', './test.txt', (error) => {
    console.error(error);
})
const fs = require('fs'); //모듈설치
fs.promises
    .rename('./test.txt', './new_test.txt')
    .then(()=>console.log('완료!!'))
    .catch(console.error);
console.log('정상적인 종료!!');
npm
- https://www.npmjs.com/
- bon init으로 package.json 파일을 생성합니다.
import 사용법
package.json을 생성하고 "type": "module"을 추가합니다.
{
  "name": "day6",
  "version": "1.0.0",
  "description": "",
  "main": "10_this.js",
  "scripts": {
    "test": "echo \"Error: no test specified\" && exit 1"
  },
  "author": "",
  "license": "ISC"
}