
*이 글을 읽기전에 작성자 개인의견이 있으니, 다른 블로그와 교차로 읽는것을 권장합니다.*
1. 하이퍼링크
a로 하이퍼링크를 넣어 해당 링크로 사이트를 접속할 수 있습니다.
- 하이퍼 링크 : 다른 페이지 또는 사이트로 연결되는 링크(문자 또는 이미지)
- <a href='문서의 경로'> 링크에 사용할 문자 또는 이미지</a>
참고: "href"는 "하이퍼링크 참조(Hypertext Reference)"의 약자
<!DOCTYPE html>
<html lang="en">
<head>
    <meta charset="UTF-8">
    <meta name="viewport" content="width=device-width, initial-scale=1.0">
    <title>Document</title>
</head>
<body>
    <h2>하이퍼링크</h2>
    <!--절대 경로-->
    <a href = 'https://koreaisacademy.com/'>코리아IT아카데미</a>
    <a href = 'https://www.tcpschool.com/'><img src="https://www.tcpschool.com/img/logo.png" alt="TCP스쿨 로고"></a>
    <!--상대 경로-->
    <a href="./1_mywebsite.html">내 첫 웹페이지</a>
    <a href="./sub/subpage.html">서브페이지</a>
</body>
</html>
2. 책갈피
a로 하이퍼링크를 이동하는 것을 다른 용도로 활용가능합니다. a herf="#이동할 객체"로 해당 객체가 있는 위치로 이동할 수 있습니다.
<!DOCTYPE html>
<html lang="en">
<head>
    <meta charset="UTF-8">
    <title>책갈피</title>
</head>
<body>
    <a href="./6_아이프레임.html"><h2 id="menu">책갈피</h2></a>
    <p><a href="#news">그림으로 이동</a></p>
    <p><a href="#book">목적지로 이동합니다</a></p>
    <p>Lorem ipsum dolor, sit amet consectetur adipisicing elit. Blanditiis omnis consectetur sunt labore unde eum, eligendi iste doloribus. Quia ratione aut, sint corrupti tempore harum sapiente sed. Voluptates, magnam modi.</p>
    <p>Lorem ipsum dolor, sit amet consectetur adipisicing elit. Blanditiis omnis consectetur sunt labore unde eum, eligendi iste doloribus. Quia ratione aut, sint corrupti tempore harum sapiente sed. Voluptates, magnam modi.</p>
    <p>Lorem ipsum dolor, sit amet consectetur adipisicing elit. Blanditiis omnis consectetur sunt labore unde eum, eligendi iste doloribus. Quia ratione aut, sint corrupti tempore harum sapiente sed. Voluptates, magnam modi.</p>
    <p><a name="news"><img src="./news.png" alt="뉴스기사"></a></p>
    <p>Lorem ipsum dolor, sit amet consectetur adipisicing elit. Blanditiis omnis consectetur sunt labore unde eum, eligendi iste doloribus. Quia ratione aut, sint corrupti tempore harum sapiente sed. Voluptates, magnam modi.</p>
    <p>Lorem ipsum dolor, sit amet consectetur adipisicing elit. Blanditiis omnis consectetur sunt labore unde eum, eligendi iste doloribus. Quia ratione aut, sint corrupti tempore harum sapiente sed. Voluptates, magnam modi.</p>
    <p>Lorem ipsum dolor, sit amet consectetur adipisicing elit. Blanditiis omnis consectetur sunt labore unde eum, eligendi iste doloribus. Quia ratione aut, sint corrupti tempore harum sapiente sed. Voluptates, magnam modi.</p>
    <p><a name="book">도착지</a></p>
    <p><a href="#menu">위로가기</a></p>
</body>
</html>
3. 테이블
3-1. 테이블 합치기
테이블시트를 만들 수 있는 태그입니다.
- 여러 종류의 데이터를 보기 좋게 정리하여 보여주는 표를 작성
- <table>로 시작하고 </table> 종료
- <tr></tr>로 행을 생성, <td></td>로 셀(열)을 생성
- <th></th>은 셀의 제목을 생성
- colspan 속성: 셀을 가로로 합침
<td colspan='합칠 열의 개수'> - rowspan 속성: 셀을 세로로 합침
<td rowspan='합칠 행의 개수'>
<!DOCTYPE html>
<html lang="en">
<head>
    <meta charset="UTF-8">
    <meta name="viewport" content="width=device-width, initial-scale=1.0">
    <title>테이블 1</title>
</head>
<body>
    <h2>테이블 1</h2>
    <table>
        <tr>
            <td>첫번째 셀</td>
        </tr>
    </table>
    <hr>
    <table border="1" width="300">
        <tr>
            <td>첫번째 셀</td>  <!--1행1열-->
            <td>두번째 셀</td>  <!--1행2열-->
            <tr></tr> <!--다음 행으로 넘기기-->
            <td>세번째 셀</td><td>네번째 셀</td>
            <tr></tr>
            <td>다섯번째 셀</td><td>여섯번째 셀</td>
        </tr>
    </table>
    <hr> <!--선긋기-->
    <table border="1" width="300">
        <tr>
            <td colspan="3">1</td>
        <tr>
            <td rowspan="3">2</td><td>3</td><td rowspan="3">4</td>
        <tr>
            <td>5</td>
        <tr>
            <td>6</td>
        </tr>
    </table>
</body>
</html>
3-2. colgroup, caption
colgroup 태그
colgroup 태그 뒤에 나오는 컬럼(th 또는 td)에 적용할 스타일을 해당 태그에서 미리 설정할 수 있도록 합니다.
caption 태그
- 표에 제목을 붙일 때 사용합니다. 기본 위치는 표의 상단 중앙입니다.
<!DOCTYPE html>
<html lang="en">
<head>
    <meta charset="UTF-8">
    <meta name="viewport" content="width=device-width, initial-scale=1.0">
    <title>테이블3</title>
</head>
<body>
    <h2>테이블3</h2>
    <table>
        <caption><p><strong>KDT 졸업생 리스트</strong></p></caption>
        <colgroup><!--단락색깔-->
            <col style="width: 100px; background-color: pink;">
            <col style="width: 200px; background-color: skyblue;">
            <col style="width: 300px; background-color: greenyellow;">
        </colgroup>
        <tr>
            <th>이름</th>
            <th>연락처</th>
            <th>주소</th>
        </tr>
        <tr>
            <td>김사과</td>
            <td>010-1111-1111</td>
            <td>서울시 서초구 양재동</td>
        </tr>
        <tr>
            <td>반하나</td>
            <td>010-2222-2222</td>
            <td>서울시 서초구 서초동</td>
        </tr>
        <tr>
            <td>오렌지</td>
            <td>010-3333-3333</td>
            <td>서울시 강남구 역삼동</td>
        </tr>
        <tr>
            <td>이메론</td>
            <td>010-4444-4444</td>
            <td>서울시 강남구 삼성동</td>
        </tr>
    </table>
</body>
</html>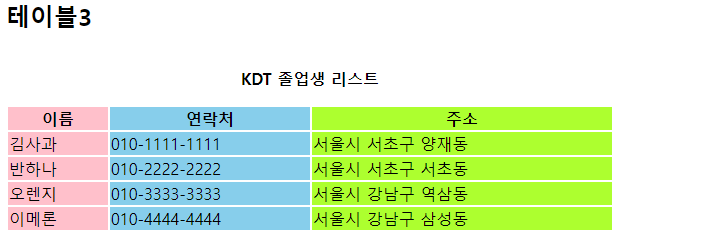
4. 아이프레임
inline frame의 약자로 웹사이트 안에 또 다른 웹사이트를 삽입합니다.
- <iframe src='문서위치' style='크기를 설정할 css 코드'></iframe>
<!DOCTYPE html>
<html lang="en">
<head>
    <meta charset="UTF-8">
    <meta name="viewport" content="width=device-width, initial-scale=1.0">
    <title>아이프레임</title>
</head>
<body>
    <h2>아이프레임</h2>
    <p><a href="./2_책갈피.html">책갈피 예제(현재창)</a></p>
    <p><a href="./2_책갈피.html" target="_blank">책갈피 예제(새탭)</a></p>
    <p><a href="./2_책갈피.html" target="korea">책갈피 예제(아이프레임)</a></p>
    <p><a href="http://www.koreaisacademy.com" target="korea">코리아IT아카데미</a></p>
    <p><iframe src="http://www.koreaisacademy.com" style="width:100%; height:500px" name="korea"></iframe></p>
</body>
</html>
5. 폼태그
웹 페이지에서 사용자로부터 입력을 받을 때 사용하는 태그 모음입니다. 사용자가 입력한 데이터를 서버로 보낼 때 사용합니다.
- <form method='전송방법' action='데이터를 받을 서버페이지'>
....
</form> - 전송방법
get: url에 데이터를 포함하여 전달하는 방법
post: 데이터를 body에 포함하여 전달하는 방법
<!DOCTYPE html>
<html lang="en">
<head>
    <meta charset="UTF-8">
    <meta name="viewport" content="width=device-width, initial-scale=1.0">
    <title>폼태그</title>
</head>
<body>
    <h2>폼태그</h2>
    <form action="./regist" method="">
        <p>아이디: <input type="text" maxlength="20" placeholder="아이디를 입력하세요" name="userid" id="userid"></p> <!--input태그--><!--id는 고윳값이므로 2개쓰면 애러남-->
        <!-- value는 결과 정해두기-->
        <p>비밀번호: <input type="password" maxlength="20" placeholder="비밀번호를 입력하세요" name="userpw" id="userpw"></p>
        <p>성별: <label for="male">남자</label><input type="radio" name="gender" value="남자" id="male" checked><label for="femail">여자</label><input type="radio" name="gender" value="여자"></p>
        <p>취미:
            <label for="hobby1">운동</label>
            <input type="checkbox" name="hobby" value="운동" id="hobby1">
            <label for="hobby2">게임</label>
            <input type="checkbox" name="hobby" value="게임" id="hobby2">
            <label for="hobby3">영화감상</label>
            <input type="checkbox" name="hobby" value="영화감상" id="hobby3">
            <label for="hobby4">낚시</label>
            <input type="checkbox" name="hobby" value="낚시" id="hobby4">
            <label for="hobby5">음악</label>
            <input type="checkbox" name="hobby" value="음악" id="hobby5">
        </p>
        <p>첨부파일: <input type="file"></p>
        <p>직업:
        <select name="job">
            <option value="프로그래머">프로그래머</option>
            <option value="공무원">공무원</option>
            <option value="전문직">전문직</option>
            <option value="취준생">취준생</option>
            <option value="학생">학생</option>
            <option value="주부">주부</option>
        </select>
        </p>
        <p>자기소개</p>
        <p><textarea name="content" cols="30" rows="10"></textarea></p>
       <p>이메일: <input type="email"></p>
       <p>웹사이트: <input type="url"></p>
       <p>전화번호: <input type="tel"></p>
       <p>생년월일: <input type="date"></p>
       <p>좋아하는 숫자: <input type="number" min="1" max="100" step="1"></p>
       <p>프로그래밍 능력: <input type="range" min="0" max="100" value="3"></p>
       <p><input type="button" value="버튼" oneclick="alert('안녕하세요!')"> <input type="reset" value="리셋"></p> <!--value=리셋은 설정된 value값으로 되돌려줌-->
       <input type="submit" vlaue="'전송"> <!--submit은 데이터를 보냄, 버튼 태그와 같음-->
       <p><button type="button">버튼</button></p>
       <!--button태그의 type=button은 일반버튼으로, 아무런 기능이 없지만 기능을 넣어서 사용함-->

    </form>
</body>
</html>
'HTML+CSS > HTML' 카테고리의 다른 글
| 웹개발(5)- HTML의 디스플레이 (0) | 2024.04.05 |
|---|---|
| 웹개발(3)-서버 호스팅, filezila (0) | 2024.04.04 |
| 웹개발(2)-html 이미지 태그 (0) | 2024.04.03 |
| 웹개발(1)-html Extensions, 문서 구조 (0) | 2024.04.03 |
| 웹개발-IP, 서버, HTML (0) | 2024.04.03 |


